Frequently Asked Question
An account, in MyTaskPanel, is an entity which function is to group all the projects under that title or denomination and invite users to work on that team.
After signing in MyTaskPanel, a default account will be generated, which will be empty for you to start creating your first project. From the Accounts button on the left margin, you can access and edit that account. Change the name, put a description (optional) and decide if the access to the projects will be either public (all members of the organization can access) or private (only members you invite will be able to access)
The next step, after creating an account, is to invite the people that will participate in one or more projects. There is more than one way to do this.
The first one consists in editing the account (if it has a private access). Do the following to achieve this:
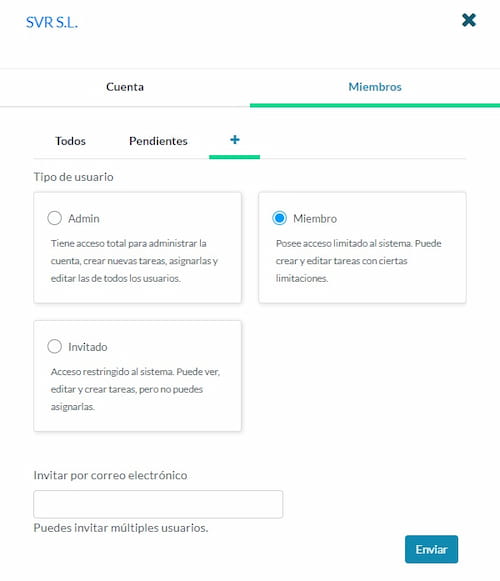
- Edit the Account which you want to give access to.
- In the Members tab, you can see the invited users who have access, the guests who have not yet accepted your invitation and,
- by pressign the + sign you can enter, separated by commas, the emails of all those users you wish to invite and the type of access you will grant them.
If you want to invite your company users to join the MyTaskPanel team, but not to a particular account, you can do the following:
- Go to the Users module, in the left sidebar.
- Press the button to Invite Users.
- A window will appear to enter all the emails, separated by commas, from the people you wish to invite, and the type of access you will grant them.
Once you edit the account and invite the users who will have access to it, you’ll have to create a Project. In order to do this, perform the following steps:
- Click on the card to create a New Project.

- You must give the project a name, a description (optional). Most importantly: decide between creating a simple create a simple Kanban board to manage task cards based on the capacity of your team (very useful when it comes to maintenance projects or very limited in scope and complexity ones) or a project with agile methodologies such as SCRUM (with iterations, functionalities and tasks).
- You will see the board with the classic columns of the view by status (to do, doing, done), although you’ll be able to choose the view By group or By user.
- Click on the card to create a New Project.
This will depend on the type of project you have chosen:
- Kanban board
- Project with iterations
Kanban board
It consists of a simple but complete list of each and every one of the tasks to be carried out in a specific project, which you can manage using a Kanban board .
It is very useful when you are in a stage of maintenance, deployment or something punctual and limited in time.
For further information, go to the “Kanban board” section in this tutorial.
Project with iterations
In the case of having the need of managing a project in stages (especially in agile methodologies, such as SCRUM, or other life cycles), this choice is appropriate. You can divide the project into iterations (also called cycles, phases or stages), where each iteration will contain a series of tasks (and subtasks) to perform.
There is greater control of the project, although it requires more administration.
For further information, go to the “Projects with iterations” section in this tutorial
The simplest way is to click in the “+” sign in the upper left corner of the navigation panel.
You can fill the detail in the main box and press Ctrl+Enter to confirm it. That’s it. Then you will have the opportunity to edit the task and add all the information you consider useful.
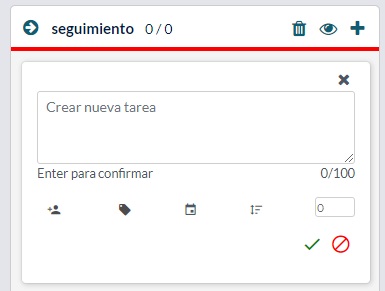
Another option is to use the icons at the bottom of the box to indicate, before confirming the new task, one or more of the following data:
- The resource to which the task is assigned
- The labels you consider appropiate to classify the activity
- The expiration date
- The priority with which it should be considered
- The estimated remaining time to finish the task
Depending on the information you fill in this step, you can obtain cards with different levels of detail. The cards try to optimize the space to show only the most relevant information for the user.
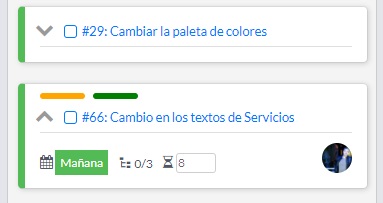
By clicking on a task card, you will have the possibility to edit all its details within a collapsible work window.
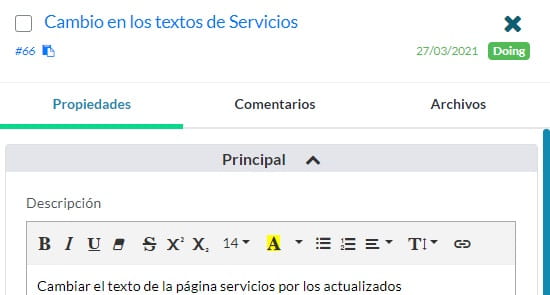
To confirm the changes press Save, to cancel, simply close the window or select another task to edit.
The available information is organized in different sections to facilitate its access. In summary, besides the name of the task (only mandatory data) you can indicate the following information for a task:
- Detailed description of the task to be performed
- User responsible for the execution of the task (who will receive the notifications associated with it)
- One or more labels that can be used to classify the task
- Dates of expiration, beginning and end of the task (this determines its state: Todo, Doing, Done)
- Estimated effort to carry out the activity
- Priority with which it should be considered (this determines the order in which it is displayed in the navigation panel)
- Estimated remaing time to complete the task and real time used in the completion of the same (this information is used to calculate the deviations in the planning)
- Reference data such as which is the main task (if it were a subtask) or in which group the task is located (groups are used to classify the stages through which a task passes, very used in Kanban)
- List of task followers (who will be notified when certain events occur in it)
- Subtasks that should be done, which is some sort of checklist with activities that can be assigned to different users each one of them
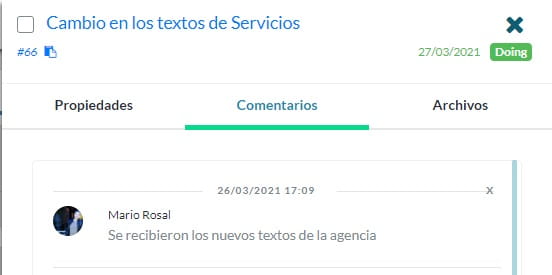
In addition to all the above, you could also use this panel to fill comments related to the task or attach files to it.
Comments can be filled in rich text.
The files to attach to the task are uploaded through the tab labeled as Files. Keep in mind that there are limitations to the type, size and number of files to upload according to the plan you have contracted.
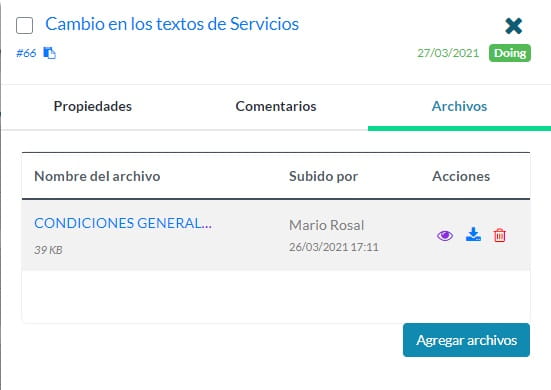
Once uploaded, the attached files can be viewed, downloaded or deleted by means of this same tab
There are several ways to record progress and end a task.
One of them is to use the cards that appear in the navigation panel to update the remaining time to complete the activity and, finally, to mark the task using the checkbox that appears to the left of its name.

The task will be marked as completed on the date this action is taken.
Note that the vertical bar on the left of the card changes its color according to the task that is pending planning (no expiration date assigned), planned (if it has a date), expired (if its due date has already expired, differentiating those that expire on the day from those that are already overdue).
Another way of updating the status of a task is through its editing pannel, which is accessed by clicking on the card. There you can edit more information, even leave comments regarding the activity performed. Finally you can use the check that appears in the upper part of the panel to mark the task as completed.
The third alternative consists in using the inbox, in which you can see all your assigned tasks according to ther status: tasks that have already expired, those that expire on the día and the next ones to expire.
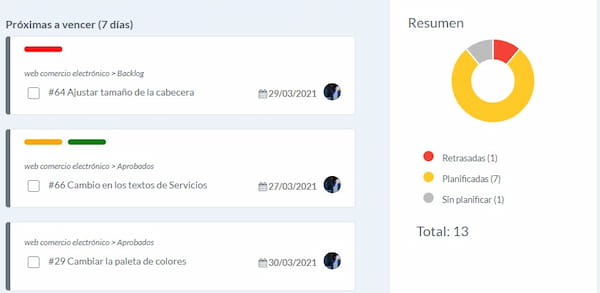
It is necessary to clarify that if a task does not have an assigned due date, it will appear as “not planned”.
In this panel you can use the checkbox to mark a task as finished or click the card to edit it.
Each task can have one and only one user assigned, who is considered responsible for the task, although not necessarily its executor.
That is, a card could have a series of subtasks assigned to different users. However, the card (or main task) would be assigned to a supervising user, who would be responsible for coordinating compliance with the subtasks.
On the other hand, anyone can sign up as a follower of a task. This serves to be notified of certain events about the activity in it.
Whether a user is responsible for a task or its follower, this one will receive certain notifications when important events occur in the task. You can unsubscribe to these notifications from your profile.
Tags are very useful for classifying a task. Each task could have none, one or more tags. The criterion for this is entirely in the hands of the project manager.

Each tag is assigned a color code to make its identification simpler. For example, the red color is often used for a tag that represents a high priority event, such as a bug to solve.
The tags can then be used in the filters (from the inbox, from the task panel or from the dashboard) to, for example, see all those tasks classified as “to improve”.
This term is a bit confusing because it is necessarily used for different purposes.
First, the list of activities (or checklist) to be carried out to conclude a task is considered a sub-task. This list is created and updated from the edit panel of a task and does not contain more information than the one displayed on the screen (a detail of the activity and a user assigned to it).

The other case in which the term is used is when a child task associated or dependent on a main task is created.
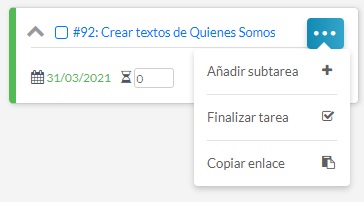
The task #95 was created by clicking on the option “add subtask” from the menu of the task that had the task #92, therefore it was created dependent on it. In Scrum, this would represent the relationship between a product backlog and a sprint backlog. In Structured methodology, it would be the functionality to be developed and the activity to be performed to fulfill it.
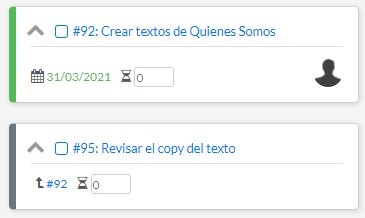
By editing an associated task (or a child one), you can see what task it depends on and edit this information, either to eliminate any dependency or to associate it with a different main task.
By dragging a main task from one group to the other, the child tasks will also be moved, although on the other hand, it is possible to move a child task independently of its maintask. However, the associated task is an independent entity and has the same characteristics as a main task or a sheet task (one that does not have children).
Attachments must be uploaded from the “Files” tab in the task’s edition panel.

Then they can be viewed, downloaded or deleted, from the same tab:
Each file is stored on the server in a secure way, using the Amazon S3.
There are limitations regarding the type of file to upload, the size of the file and the total storage space contracted per account. If you require more space, you can request a plan upgrade.
Whether a user is responsible for a task, its follower or the user assigned to perform a subtask, will be notified each time an important event occurs within that task..
The events that are communicated will depend on the role you occupy and the type of assignment you have. The most frequent cases of notifications are:
- When you have been assigned a new task or deleted a previous assignment
- When a task that you have been assigned or a follower of that task, change group (for example, if it passes to testing) or status
- When someone enters a new comment on a task that is yours or on one that you follow
- When you are a follower of a task that changes its due, start or end date
If you do not want to receive any of these notifications, you can customize them from your user profile.
When a new project with iterations is created, by default a tree with a first iteration is created which you should rename. You can use the second button on the bar to display the mentioned tree.
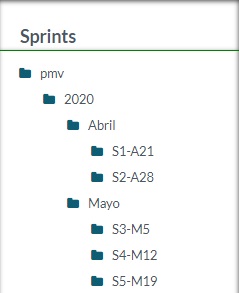
You can use the mouse to drag iterations and build a tree of as many nested levels as you want. As you hover over each iteration, three dots will appear. If you click on them, you will be able to display a context menu to add a new sprint, modify the dates or name of the selected one, or delete it. You can also use the “Move pending tasks” option so that, once an iteration is finished, incomplete tasks can be moved to another sprint. It is essential to understand that in this type of projects there is always an active sprint and all the tasks displayed or added will be linked to that sprint. However, by selecting root (the project) you can see all the tasks of all sprints.
The truth is that there are many ways to do it and it depends on the life cycle that they are using which would be the most indicated. Basically, a product backlog (PB) is nothing more than a functionality to implement, with more or less level of detail. While a sprint backlog (SB) is a task to be carried out with a compliance officer. To register the PBs they could use a folder in the sprint tree containing several cards with the functional detail, or simply a parent task with the functional description. To register the SBs, they could use simple task cards within the aforementioned folder or daughter tasks (associated with the PB card previously created).
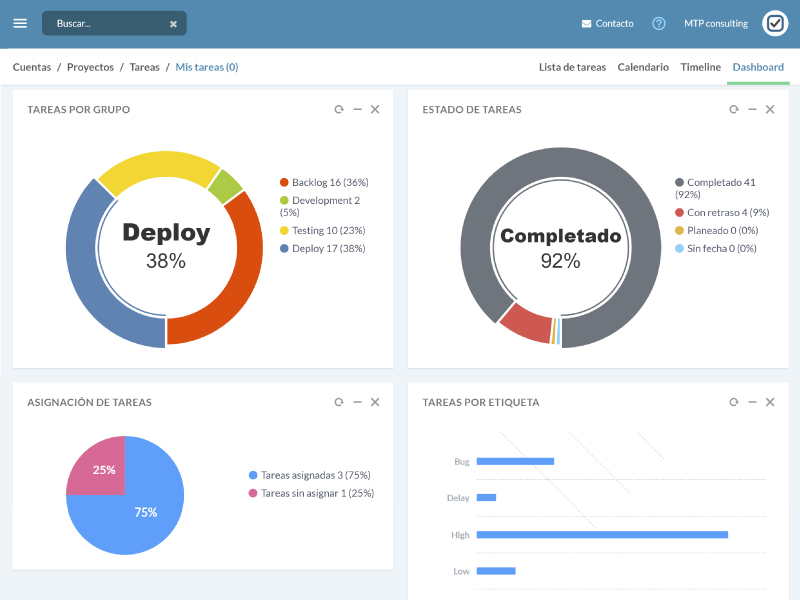
To keep track of the general state of all the tasks of a project, there is a control panel that provides valuable information on the highlights of the project status. This board also has a section of filters to consult even more precise information.
